Birds of the Blue – Pelagic Adventure 2014

On May 17, Kaitlin and I embarked upon my first ever pelagic boat trip.  The purpose of a pelagic (def: of or relating to the open sea) is to venture far from land into deeper waters and open ocean to see birds that are virtually impossible to see from land unless you happen to be sailing past the remote pile of rocks on which they breed, which is pretty unlikely.  Birds like shearwaters, boobies, petrels, albatrosses and skuas spend large parts of their lives riding the winds and skimming the jagged steel grey veneer of the world’s seas, every so often dipping their bill in to scoop up some krill (or popcorn in our case) or plunging into the depths to spear an unwary fish.

My excitement at the prospect of seeing a whole new suite of magical and mysterious birds was tempered by a checkered past of ocean upchucking.  But I reasoned that if I can suffer through a gauntlet of pig feces, waist deep swamps and mosquito clouds doing bird surveys, then surely I could survive one day on a boat.  Luckily Poseidon took pity on me and even a dyed-in-the-wool landlubber like me managed to keep his composure for 10 out of the 12 hours at sea (the other two involving sleeping and puking of the back of the boat), which I’m pretty proud of.

Here are some of the delicacies the ocean served up to us on this fine day (side note:  this was my first attempt, with a new camera, of taking photos of constantly moving birds on a constantly rocking boat but I think the results are quite passable).  Before embarking on the boat I did some research of some of the birds we might see and found that this is a good time of year to see South Polar Skua, a legendary pirate and predator of open seas and arctic wastelands (nesting in Antarctica and roaming the North Pacific during the southern winter).  So here’s the crown jewel of the trip to start off.  I was actually half asleep in mid-drool when somebody bellowed, ‘SOUTH POLAR SKUA’ and I was up like a shot, camera at the ready!  Luckily this coal-black marauder made his one pass an epic one by flying right over the boat and giving us amazing views.  A classic Skua with imposing build, hunchbacked appearance and white-based primaries.  Definitely a bird that the drawings in the field guide just don’t do justice to.

P1050540

Going back in time a little bit, as we left the harbor we immediately began chumming (tossing food into the ocean to attract gulls which ideally attract other birds) and picked up a merry band of ravenous raiders.

Brown Pelican

P1050338

Kaitlin feeding a greedy Western Gull.

P1050341

Adult Heermann’s Gull showing a few aberrant white primary coverts.

P1050365


Sooty Shearwater in heavy flight feather molt.

P1050401


Pink-footed Shearwater

P1050417

Pink-footed Shearwater showing classic tubenose bill (may have to zoom in a bit).  The tubes at the base of the bill are apparently used to smell food from long distances, in this case the ‘Buttery Flavoring’ on our chumming popcorn that was slowly meted out with a measuring cup from a bag of popcorn the size of Santa’s toy sack.

P1050446


Laughing Gull, apparently a very rare bird 15 miles out at sea, as one of the guides who has been going out on pelagics off San Diego told me that in 40+ years this was only the second one he’s seen.

P1050535

Black-footed Albatross eschewing its typical cuisine for some Orville Redenbacher.

P1050590

Black-footed Albatross initiating take-off.

P1050637

Another rarity, the Red-billed Tropicbird.

P1050649

And the final victim of our irresistible popcorn onslaught, a magnificent breeding plumaged Pomarine Jaeger showing classic twisted spatula tail feather.

P1050674

All things considered, a grand day on the high seas that has me already budgeting and schedule scheming the next journey into the briny deep!


Learning to be a wren

In late August and early September I had the pleasure of an extended stay in my ancestral homeland of Iowa.  It is always a blessing to return and visit family and to have the opportunity to further explore the land that my family has cultivated and nurtured on the bluffs overlooking the Mississippi.  Every time I spend time on our little prairie-woodland preserve I immerse myself deeper in the land and discover new plants and animals that live there among us.  Amongst other new friends who revealed themselves to me on the this trip  (Yellow-throated vireo, White-lined Sphinx Moth), was a new family of Carolina Wrens.  One day my dad came in from the shed out back where we keep the tractor and said that he’d seen a nest with baby birds in it tucked into a dark corner.  I thought this strange as early September seemed a little late to be having a brood.  But being that the weather was unseasonably warm and Carolina Wrens are a year-round resident (therefore not needing to devote precious energy to refueling for migration) it seemed plausible.  Actually, taking a step back, at first I did not know they were Carolina wrens because when I first saw them they were probably only a few days out of the egg and pretty much indistinguishable form any other small baby songbird (at least to me).  But after a few days of careful observation I finally saw what turned out to be the father make a furtive dash underneath the shed door to feed the chicks and then pop out a minute later to start warbling away on a nearby branch.  As my time in Iowa was limited and the birds were so tiny I wasn’t sure I was going to see them leave the nest but not more than 4 or 5 days later I was wandering around the backyard when I began to here a cacophony of high-pitched cheeping coming from the ground beneath a row of cedars.  I had to search for a minute but eventually I locked in on two Carolina wren fledglings gleefully hopping about and learning to fly with the help of the tree trunks.  Thankfully I had my scope and iPhone adapter handy so I can share with you exactly what I saw.  Thus, I present to you, ‘Learning to be a Wren’…

Here’s a youtube video link, follow by some picture because nobody cares about a blog post with no pictures

IMG_1784

In case you’re wondering, the wispy things on its head is not some sort of lens aberration, its downy baby feathers that it is molting out of.

IMG_1786

Trying to get rid of those darn baby feathers…they grow up so fast!

IMG_1795

Not so fast that they w0n’t still accept food from dad though.

IMG_1799

A little post-meal beak cleaning.  It’s always good to develop good dinner decorum at a young age.

IMG_1805

You have to crawl before you can fly.

So after this sequence took place, our little friend here was sitting patiently on its branch waiting to be fed again.  I wasn’t able to get a good video of the first feeding session which meant that I was also waiting patiently for the next one.  My patience paid off.  After about 5 minutes of staring at a motionless bird I caught a movement out of the corner of my eye and assumed Papa Wren was on his way back.  I was wrong.  What happened next and what I serendipitously captured on video still mystifies me.  The movement I had seen ended up being either a female or a juvenile American Redstart (a type of warbler for any non-birders reading this) who suddenly descended upon the young wren!  The redstart hovered over the wren for a moment, clawed its head (still couldn’t get those pesky downy feathers out though) then flew off, never to return.  I’m still not sure what was going on.  My only logical guess is that since the redstart was getting ready to migrate and eating voraciously in preparation that it considered the wren as competition for the same food source and being that it was not moving it became an easy target for attack.  Who knows?  Take a peek at the video and judge for yourself.

Thankfully the wren seemed unfazed and I saw it and one of its siblings the following day hopping happily around the yard and chirping away (here’s a recording in fact: http://www.xeno-canto.org/147193) with no rogue warblers in sight looking to hand out some beatdowns.

May Midwest Morel Migration Magnus Madness: 2013, Part 2: Iowa

People familiar with this little nickel-and-dime operation may remember from the last post that I recently spent some time in Chicago looking at birds and pretending to get electrocuted by my nephew to his endless pleasure and his mother’s dismay (apparently giving a 2-year old the impression that electrocution is fun is frowned upon for reasons that probably should have been obvious to me at the time).

A day later I was on my way to the Wilcox Prairie Preserve (unofficial name) in lovely  southeast Iowa for another day of power birding  and morel hunting.  I knew the birding would be stellar and my mom’s facebook morel photo tease from a few days prior had me anticipating a bumper harvest.

I didn’t have to travel far before being presented with some great photo ops right outside the front door courtesy of our splendid array of bird feeders.  A lot of our common feeder birds disperse into the woods to breed or move north during the spring but thankfully our animated friends Red-bellied and Red-headed Woodpecker remain, peckin’ away at peanuts and suet.

Female Red-bellied Woodpecker

“Like exsqueeze me, but have you ever heard of styling gel?!”  (sometimes I feel like my life is just one continuous ‘Zoolander’ reference).

Red-headed Woodpecker

The allure of the prairie and the forest soon beckoned me away from the yard and into the wild.  I began my journey by skirting the woods on the perimeter of the property in search of migrating warblers.  The warblers sadly eluded me, but their absence was quickly forgotten as I was greeted with a welcome sound emanating from deep within the woods: the guttural staccato rattle of the Yellow-billed Cuckoo!  I added the exclamation point because I was excited for multiple reasons.  First because these are really cool birds.  Second because although they are fairly common summer residents in Iowa, they are quite elusive and I’d never seen or heard one on our farm.  Third because my next bird field job starting in June is working with them so this was like a little preliminary field study.  I ended up hearing 6 of them over the course of the day calling back and forth so I hope they’re breeding there.  I also got lucky enough to get my scope on one (not an easy feat) and it cooperated long enough to get some halfway decent photos.

Yellow-billed Cuckoo

After this unexpected find I took to the woods to see what other treasures awaited me.  On the way I saw one of our favorite old friends the Pileated Woodpecker and was serenaded by a trio of warbling Wood Thrushes and Red-eyed Vireos.  Along the way I discovered this little magical abode that made me wish I was a woodpecker.

Upon emerging from the woods I scored another first-time Iowa sighting of a Summer Tanager.  Southern Iowa is the northern extent of their typical summer range and I don’t think they’re super common here so this was an exciting sighting and it was a pair to boot although the female proved too shifty to photograph.

Once the tanagers had retreated into the safety of the woods I made my way back to the prairie where my goal shifted to Ammodramus sparrows.  This group of sparrows is found in grassland habitats and are often very secretive and seldom perch in the open except when singing.  Many of these species are declining and quite uncommon due to loss of grassland/prairie habitat over most of their traditional range.  However I had the fortuitous advantage of being in the midst of a lush and healthy prairie ecosystem that has had about 20 years to attract such species so I figured the odds were in my favor.  After a little standing and staring (a tried and true birding tactic) and sifting through a choral cacophony of Common Yellowthroat, Indigo Bunting and Field Sparrow, I finally heard something that didn’t fit and went to investigate.  With the help of my bird guide app with vocalizations and my trusty scope I concluded that I had discovered the rare and richly hued Henslow’s Sparrow.  This is definitely a species in decline that needs habitat like this to stay afloat so hopefully the two counter-singing males I heard brought some ladies along because what’s the point of defending your patch of grass if you don’t have a little Henslowita to kick it with?  Anyway, here’s some grainy pictures to offset my lame attempt at talking about birds mating in non-technical language…

What’s happening here is that he is warbling so vociferously that he’s actually shaking which is why the photo is blurry!  You see, not my fault.

This would be the classic sparrow shot, spread eagled grasping two pieces of grass, if only it was a little more clear.  But you can still get a good look at his distinctive double-mustache face pattern and the colors of the grass are a little less washed out.

This was the best shot I managed but you can clearly see his olive green head and intricately patterned back and sides.  A truly gorgeous bird that the pictures don’t quite do justice.  Becoming acquainted with birds like this and getting to see them up close helps one to appreciate them as more than just a brown blur that you see out of the corner of your eye as it flits through the prairie grass 50 yards away.  Seek and you shall find.

In closing, a spring trip to the midwest would be woefully incomplete without the only ‘M’ not yet mentioned from the title…

Trying to look up (birding) and look down (mushrooming) at the same time don’t necessarily compliment each other but I think I managed success in both endeavors on this trip.  Until next time…

May Midwest Morel Migration Magnus Madness: 2013, Part 1

Spring is one of those times of the year when one is reminded of the blessings of living in the midwest. The gnats and mosquitoes are beginning to wax but have not yet become a dominant force. The distant roll of thunder replaces the eerie silence that precedes a snowstorm. The first spring rains and warm temperatures conjure magical morels from the forest’s sodden turf. And the miracle of migration welcomes back a dizzying array of birds from their wintering grounds in far away lands.

While I have not resided in the Midwest for 7 or 8 years, I try to make a yearly pilgrimage there in the spring. The tradition began because my birthday often roughly coincides with the burning of the prairie at my family’s rural home. But since this only happens every 3 years and the birds come back every year, well galldarn it I started going back every year too!  And with the added incentive of seeing my 2 year old nephew Magnus, I once again took flight on my annual spring migration (not very creative, I know, but it just seemed so appropriate!).

So with my new spotting scope in tow I hit the trail and began beating the bushes for birds. With my newfound knowledge of phonescoping (taking pictures of things through the eyepiece of the scope), bestowed upon me by my friend Tim Schreckengost, I was ready to document my adventure with prodigious numbers of gloriously grainy, slightly out of focus digital photos.

After arriving at midnight on Thursday, I awoke at dawn to chase warblers and other spring gems at Lincoln Park, Chicago.  Since most birds have not adapted to milling around the feet of unsuspecting restaurant-goers and gleaning scraps, when they find themselves high above a sprawling metropolis at first light after a long overnight journey they make a beeline (birdline, perhaps?) for the nearest stretch of greenery, in this case, Lincoln Park.  The highlight, and sole life bird,  of my sojourn to the park was the elusive Mourning Warbler, alas, too elusive for a photo.  But I did manage to get a decent shot of this uncharacteristically passive Scarlet Tanager.

…and a White-crowned Sparrow

With Lincoln Park being a little slower than expected birdwise, I packed up my gear and headed north to Gillson Park in Evanston.  The last time I was there I found a $20 bill lying in the grass so I had high hopes that this visit would prove equally auspicious.  I was not disappointed as I was able to see my lifer Clay-colored Sparrow and got some great pictures of other birds like this Savannah Sparrow…

and this Eastern Kingbird…

To cap off the day I actually interacted with some humans.  Uncle Bobby got to teach his favorite nephew about the liberating benefits of accepting pink into one’s wardrobe…

Tune in again soon for part 2.  No more cute toddler photos but plenty of excellent birds in SE Iowa.  Farewell.

Roadkill Deer: Phase 1 – Meat Retrieval and Hide Tanning Prep

For some time now I’ve been interested in tanning an animal hide to create leather.  Where this desire came from I’m not entirely sure but I suppose when one starts to become immersed in the primitive skills community the idea of tanning just enters one’s sphere of consciousness at some point.  A few years ago a girl gave me an elk hide that had been salted, thereby preserving it (for how long I’m not sure), and I’ve been sitting on it ever since but now that I have some space to work and no neighbors to freak out I decided to start the process of  building a frame to string it up in and scavenging materials to make various tools involved in the operation.  In the meantime however, serendipity struck and on my way home from town one night what should my headlights fall upon lying on the gravel ahead but a roadkill deer! Thankfully I was not the one to hit it but after feeling its still heart and residual warmth I determined it was pretty recently dead (the fact that I had driven past this spot 2 hours prior on my way into town was further evidence that it was a recent kill).  Having planned for just such an eventuality I quickly retrieved the heavy duty plastic bag from my trunk, stuffed the little gal in and made tracks back home before another enterprising opportunivore came by with their own plastic bag.  She spent the night in my trunk as it’s now reaching refrigerator temps at night.  Upon arriving at work the next day my friend Tim (who had found and processed a roadkill deer a week prior) took my quarry down by the creek, strung her up by her neck from a tree and proceeded to butcher her.  Alas, I did not have the presence of mind nor the cleanness of hands to be able to photograph this process so you all get spared the scenes of grisly evisceration.  Her stomach had been damaged during the collision and released some of its contents so the process was a bit smelly but otherwise fairly straightforward.  After cutting around the throat and making slits up the front legs up to the body, the hide just peeled right off like a banana peel, leaving it in perfect condition for tanning.  It is my understanding from the tanning literature that hunters who are typically not concerned with the hide will use knives to remove it, often leaving it damaged and riddled with holes.  The peeling method was far superior.  The hide was then placed in a plastic tote to soak and we proceeded to harvest the meat.

Meat in a cooler.

Meat on the counter.  This is only half the meat.  I gave the other half to Tim.  As I don’t have a freezer I was limited in how much meat I could preserve.  I ended up making a huge stew that lasted me about a week and a huge bag of jerky, dried in the oven.  The backstrap (far left), which is the choicest cut, I had on it’s own with some sort of marinade that I can’t remember.  It was fantastic.  Anyway, this is not a food blog so on to the tanning.

The hide in it’s water bath.  The hide is soaked in order to loosen the hairs which will eventually get scraped off.  I soaked my hide for a few days both to loosen the hairs and to keep it cold until I got a chance to start the process.  As I don’t have a fridge, cold water in a bucket, changed a few times a day, was my best option.

The first phase in the process is called fleshing.  When the hide is removed from the animal, whether inexpertly hacked off or smoothly banana-peeled, there are inevitably bits of meat that remain on the inside of the hide.  These must be scraped off chiefly because they are not part of the hide and thus not part of the tanning process and in the more immediate practical sense, because they will go rancid.  The scraping is achieved with a few simple tools, the flesher (an old rusty piece of metal I dug up in the scrap yard) and the fleshing beam (in this case an 8 in. diameter plastic pipe).  The flesher just needs to be a metal bar (I suppose it doesn’t have to be metal but most of the books I read suggested it) with right angles and relatively sharp edges.  The beam must be as smooth as possible because a large amount of pressure is applied to the hide during the scraping process.  Any surface irregularities on the beam increase the chances of ripping holes in the hide as you scrape.  The hide is simple draped over the beam and then propped up against something (in this case, my house) to hold it there and then the flesher is held at about a 45 deg angle to the hide and scraped over the surface, removing all unwanted meaty bits.

Hide after fleshing.

Once the fleshing is done the hide is stretched in a frame to dry (this assumes one is using the dry-scrape method, which I am).  First, slits are cut every 4 or 5 inches around the perimeter of the hide.  Then, slowly working from top to bottom and side to side, the hide is strung into the frame and tensed evenly so there are no loose or folded areas, thus allowing the hide to dry evenly and fully.  A small amount of slack is left in the strings to allow for shrinkage as the hide dries.  If it’s pulled too tight initially you run the risk of popping some of the tie holes during the drying process.

I think I’ll stop here as things start to go off the rails from here and I want you all to be able to revel in my short-lived victory before reality sets in.

Until next time…

*Note:  The details of the the process described above are clearly far from exhaustive but if anyone is interested in learning more here are the references I used:

“Blue Mountain Buckskin: A Working Manual”, by Jim Riggs

“Naked into the Wilderness 2: Primitive Wilderness Skills, Applied and Advanced”, by John and Geri McPherson

“Participating in Nature”, by Thomas J. Elpel

“Step-by-Step Brain Tanning the Sioux Way”, by Larry Belitz

Awash in Autumn’s Bounty

At the risk of sounding corny or cliche, I think there is something primal that is reborn in us through the act of gathering wild food whether it be fishing, hunting, or foraging.  In some small way (small in the sense that the overwhelming majority of us do not come close to sustaining ourselves on wild food) it reconnects us with our shared heritage as people with a strong connection with the land.  And let’s be honest, we all probably have a fond memory from childhood of mulberry trees lining a dead end gravel road, a grove of trees where morels magically appeared year after year, a blackberry bramble on the edge of the woods, crisp, spicy watercress in a hidden spring gurgling from a hillside, the list goes on and on.  As adults, many of us have ‘responsibilities’ which preclude such idle wandering and exploration but that does not mean such larders do not still exist, promising the joy of discovery and oftentimes abundant free food.

Case in point: on a recent drive through the countryside I came upon a number of cars parked along a tree lined stretch of road and noticed a number of hunched over people carrying an assortment of bags and buckets slowly cutting a meandering path beneath the trees.  Then up ahead I spotted a shock of blonde hair, set off by a black sleeveless t-shirt and a dizzying array of tattoos, the unmistakeable visage of my pal Matty Musselwhite (aka, Punker Matt, a pool skater of near legendary status in his heyday).  Being a well known self sufficiency maven and forager and general rabble rouser I knew his presence at this spot was fortuitous.  So I pulled over and quickly found this lonely stretch of road to be a well tapped but highly productive source of chestnuts, walnuts and pears (part of an orchard that is apparently not being harvested as many of the pears, for what reason I do not know).  That day I only had a small bag so was unable to take full advantage of the abundance but thankfully I stumbled upon this spot early in the season and have been able to return in successive weeks and harvest heaping bags full of walnuts without putting so much as a dent in what’s there.  Many times as I dropped a walnut on the way to my bag only to go to pick it up and find another sitting right next to the one I had dropped.  It was so easy I was literally laughing at times at how many nuts were within reach each time I bent over.  My willingness to battle with the understory of brambles certainly bolstered my harvest, but nothing some sturdy rubber boots and heavily (actually more like moderately but that doesn’t sound nearly as manly) calloused (more splintered than calloused now) hands couldn’t overcome.  The brambles actually prove to be a blessing as well as a curse for the intrepid forager as most are not willing to brave their thorny defenses, rewarding the ones who are (i.e. me) with an untapped cache of pristine walnuts!


From left to right; acorns, walnuts, pears and chestnuts.  Not really sure what I’m going to do with the acorns yet.  Apparently you can make a primitive kind of flour with them but I’ve had too many other projects going to try it out.  I tried one raw and it was actually quite sweet and pretty tasty.  Another was pretty astringent and not very palatable.  Traditionally they were boiled numerous times depending on the type of acorn to remove the tannins.  Hopefully I’ll get around to trying this eventually but until then they sure look pretty sitting around in bowls.


The four specimens.

Walnuts drying on a screen.  Strictly speaking this step is not necessary for edibility but I think they taste a little better and have more flavor after drying them out a bit.


As I could not feasibly eat all the pears I gathered without getting sick of them I decided to dry them.  I don’t have a dehydrator so I used the next best thing, my oven set to 175 degrees with the door ajar.  The process was pretty simple.  I just cut them in ~1/8 in. pieces and laid them out on a variety of racks, foil and Pyrex dishes, put them in the oven and waited, rotating occasionally.  Timeframe was anywhere from about 3 hours (Pyrex) to 5 hours (rack).  I guess the Pyrex just absorbs and holds more heat.  Personally I like dried apples more than pears but beggars can’t be choosers.  The drying process concentrates the sugars so the finished product comes out sweeter which in the case of these often disappointingly bland pears (maybe that’s why they didn’t harvest them) was a positive.

So there you have it.  Happy foraging!  Next up, chanterelles!

Behold the Cob Castle: Part I

Hello again.  So, as luck would have it, I was able to quickly find work in my new place of residence and this post will be a short history of my time there thusfar.  A fellow Jonathan (who I taught in the House Alive Natural Building Apprenticeship in the summer of 2011) and his partner Drew bought of piece of land down here and decided to build themselves and little mud house…with a little help of course, and that’s where I come in.  I wasn’t around for a lot of the project but due to a reshuffling of the work crew I was able to come on for the final stages.  This is one of the larger cob houses I’ve worked on and certainly the tallest.  The interior footprint of the building is about 300 sq. ft. but there is a second floor so the total square footage is about 500 sq. ft. (part of the house is open all the way to the ceiling).  I refer to interior footprint because the walls are 18 inches thick so calculating the actual footprint of the building wouldn’t really give  an accurate representation of usable space.  That’s pretty big by cob standards and pretty small by American standards but there will only be two people living here and there will also be a second story deck on the east side (right, in the photo) and a ground level porch on the west side.  The height is what is really unique at least in terms of the cob structures I’ve worked on.  The highest cob in the building will be about 24 ft. at the crest of the roof which, outside of Yemen (where they build 9 or 10 story buildings out of cob) is something rarely seen.  Structurally there are no issues whatsoever, the trick is getting large amounts of heavy material 20 feet up in the air which is why people rarely build this high with cob.  I don’t know how in the hell they do it in Yemen but here in southern Oregon we used a Bobcat skid steer to lift big shovelfuls of cob up onto the top of the scaffolding.  When we had to give that back to the rental place, we rigged up a pulley system to bring up one five gallon bucket at a time.  It seems slow, which it probably is, but we’re also working with a very small crew most of whom are peripatetic European (commentors, please insert lame, snide jokes about Europeans work ethic here) volunteers so in relative terms the house is going up pretty quickly.  On to the pictures…

There’s Drew for scale, he’s about 6 ft. 2 in.  The house as you can see is comprised of a square section (background) and a hemispherical bumpout (foreground).  Much of our time is spent rearranging scaffolding as the walls ascend.  As with all cob building sites, proper scaffolding is supplemented with a semi-balanced pile of sketchy strawbales.  I hope nobody reading this is employed by OSHA.

Here’s the downstairs looking from the square section into the bumpout.  All of the rafter poles and support poles were harvested from the land and are primarily Douglas fir with a few Western red cedar mixed in.

Here is the upstairs with the rafters for the southern portion of the roof being installed.  There are basically two different roof systems with different pitches going in on the south and north side of the house.  They are separated in the middle by a clerestory, which is basically a framed in row of windows that sits on top of the main ridge beam and raises up on end of the north side rafter, making the pitch higher.  If that doesn’t make sense just wait, there will be pictures of it in due time.

Outside view from the east of the rafters going up.  There will still be another four feet of cob on top of the highest wood beam in this picture and then the cob will slope down to meet the beam sitting in the wall on the far right (north) of the photo.

View from up the hill south of the building site.  Roof construction continues as it starts to take on the look of a real house.  Stay tuned for Part II…

Sky Islands Birding Odyssey


Hello again.  After many post involving building things with mud I decided it was high time to throw something up here about one of my other passions in life, birding.  What you might ask qualifies as ‘birding’ and what defines one as a ‘birder’?  Perhaps you’re wondering if I’m one of those nutters who keeps lists of the birds he sees and travels hundreds of miles to see a bird that is common over half the world but just randomly and unexpectedly shows up on the coast of Oregon for a week before disappearing again.  Well, yes and no.  A woman during the trip I’m about to write about did not label herself a ‘birder’ because she didn’t travel specifically to see birds.  Fair enough, but she also welcomes guest to her house year round to view rare hummingbirds in multiple galleries surrounding trees strewn with sugar water feeders and hundreds of swarming hummingbirds (amongst many other species, all of which she knows intimately).  My point is that quantifying the act that a word is meant to define can often be a murky business.  I do keep lists of the birds I see in certain places (especially if going on vacation to somewhere where the baseline avian fauna is unfamiliar to me) and I also have made numerous trips for the specific purpose of birding.  But when people ask me how I got into birding (or bird-watching if you prefer) my answer has nothing to do with lists of any sort of competitive drive to see as many birds as possible over a certain span of time.  My primary reason for watching birds is that they provide a unique and I believe unmatched way of connecting with ones natural surroundings, even if you live in a city.  Outside of being relatively plentiful, most often beautiful, and having for the most part (sorry blue jays and crows) lovely singing voices, birds can provide a keen observer from the deepest woods to the busiest city street with an incredible wealth of information about what’s going on in world outside our front door that we (I include myself in this) are so often woefully detached from.  When I began to pay attention to the lives of birds it was not long before I started to tune into a deeper level of awareness of what was happening all around me.  When you’re focused on finding birds it quickly becomes obvious that you’re not going to be very successful if you just go blasting through the forest as we so often do when we’re hiking and just trying to get from point A to point B and back again.  You are forced (assuming you actually care to see birds or any other creatures for that matter) to slow down, stop and look around every once in a while and most importantly, listen.  When you start to listen to what the birds are talking about, you first get to see them in all their beauty and diversity that you probably never even knew was there.  And eventually in becomes apparent that they are not creating this vast array of vocalizations for our entertainment, but they are communicating information about what’s going on in the natural world, weather, movements of other animals, etc.  I could go on and on but I’ll end this diatribe with a suggestion to everyone (probably about 3 people) reading this.  The next time you step into the woods or even a park, slow down, and tune into what your ears are communicating to you rather than just relying on your eyes (although I’d suggest maintaining your visual connection with the local poison ivy population).  You may notice that by slowing down and stopping every once in a while you start to hear more than just the impenetrable din of rustling leaves and cracking sticks.

And finally, on to the post.  So after dropping Jess off in Austin, I began to make my way back to Oregon but not before taking a nice long side-trip in the truly magnificent Sky Island mountain ranges of southern Arizona.  It just so happens that these ranges host an incredibly diverse bird population (amongst other creatures), many of whose U.S. range is contained within this small corner of SE Arizona.  It’s something of a spillover affect from the similarly mountainous regions of northern Mexico where most of the birds seen here are common residents.  The first photos are from the Chiricahua Range, just west of the New Mexico border and just north of the Mexico border.  The Chiricahuas are one of the ‘Sky Island’ ranges of southeastern Arizona.  If we are to believe Wikipedia, a Sky Island is defined as, ‘mountains that are isolated by surrounding lowlands of a dramatically different environment, a situation which, in combination with the altitudinal zonation of ecosystems, has significant implications for natural habitats. Endemismvertical migration, and relict populations are some of the natural phenomena to be found on sky islands’.  In layman’s terms, really pretty mountains surrounded by desert with a diverse population of unique flora and fauna.  On to the pretty pictures…

Trial run of the new hammock.  It work fabulously on numerous occasions.  It takes a few tries to get your body positioned properly but once you do it’s smooth sailing.  This one has a mosquito net built in.

The Chiricahuas was definitely the most visually stunning of the ranges I visited.  If you were to look at these massive bedrock cliffs and spires up close you’d see that they all are plastered with a virtual rainbow of lichens making them quite a bit more striking than your average rock.

Hummingbird Interlude…

Any institution, be it private home or business, worth its salt in SE Arizona has numerous hummingbird feeders and birding related tourism is actually a fairly big deal down here so there are many feeder installations that are open to the public (some private homes charge a small ‘sugar fee’).  These are obviously the best spots to get good looks at the 15 or so species of hummers you can see down here (by far and away the most vaiety in the country) and each feeder hub probably host between 50 and 100 birds…at a time.  It’s total insanity with a constant stream of hummers chirping, fighting, eating and chasing each other around.  This first series of pictures was taken and a place called the Southwestern Research Station which bore an eerie resemblance to the Dharma Initiative village on ‘Lost’ but had a lovely public hummingbird viewing gallery so it was easy to ignore the polar bears and high powered electric fences.

A rare moment of peaceful sharing between a male (left) and female Black-chinned hummingbird.

Death from Above.  An unsuspecting female Rufous hummingbird awaits ambush  from an unidentified female assailant.

A female Magnificent hummingbird dines alone.  She’s a bit intimidating at a robust (for a hummingbird) 5 inches.  It’s pretty strange seeing a hummer this big.  You can actually see their wings moving as they don’t move quite fast enough to become a blur and they even glide sometimes in flight, an activity you are very unlikely to see in a smaller species with more rapid wingbeats (nerdy, I know, but cool nonetheless).

The next sequence of pictures details one of the cooler moments of my life so far.  As I haven’t gotten married and don’t have children I can’t really say how it might stack up to such happenings but I’m guessing it will remain firmly in the running for coolest moment ever.  The moment (or rather, about 5 minutes) I speak of is getting to hold a Blue throated Hummingbird.  One of the mornings I came to the research station there was a hummingbird banding (a regular event there apparently) going on so I hung out with the banders for awhile and asked a bunch of questions.  After they catch the birds and take all their measurements the birds are quite depleted and a little stressed so you have to feed them so they can reenergize and then provide them a launch pad (the palm of your hand) to reenter the wild.  After lurking there for an hour and pestering them with questions they finally asked me if I wanted to provide a launch pad, a request which I gladly accepted.  The first few birds barely touched my hand before ascending into the safety of the trees but this one took his sweet time and me and my camera were not about to complain.  I’ll let the pictures speak for themselves. On the third one you can actually see two droplets of nectar on his face, on between his left eye and beak and the other just on the right side of his beak near the base.


If you are disinclined to enjoy majestic sunsets then I would consider not visiting southeastern Arizona during monsoon season.


Back to birds…

Fledgling Spotted Owl.  The picture is a little grainy but I didn’t want to get close enough to disturb him so had to super zoom on my little point and shoot digital camera.  Clarity suffered. I watched this little guy for about an hour as two squirrels few within 10 or twenty feet of him, sometimes on the same branch.  He was following their movements intently so I hung around hoping to maybe catch his first kill.  Finally one of the squirrels got within about 3 feet of him on the same branch.  There was an awkward moment where they both looked at each other and sized up the situation.  After a few moments of indecision (or perhaps energy conservation) on the owl’s part the squirrel leapt to a higher branch and went on his merry way, apparently deciding this young chap was not ready for the big leagues yet.

Male Broad billed Hummingbird, a striking pallet of emerald greens, teals, and purples set off by a bright red bill, truly stunning.


The rare (in the US at least) Violet crowned Hummingbird, only regularly seen at a few feeder banks near Patagonia, AZ.  I also got lucky enough to see one catching bugs out in the woods but couldn’t get close enough to get a picture.


Better shot of the violet crown but a little more blurry.

And last but surely not least the magnificent Plains Lubber grasshopper.  As with everything else in SE Arizona, grasshopper species are diverse, colorful and all over the place.  It’s easier to appreciate them as they bounce off your legs and fly into your head when they’re this pretty.

Cob Living: First Impressions

Thus begins my first stint actually living in an earthen building.  Many a mud wall have my hands sculpted but not until 5 days ago have I had the pleasure of living within those walls.  The cottage I now reside in is about 200 sq. ft., more than enough room to store most of my worldly possessions without feeling cluttered.  This feat would probably not be possible without the extreme purge which occurred as a result of Jess’s and my move from our beloved Portland.  Jess is off to graduate school in Austin, Texas and I as previously mentioned have moved into a cob hut in the Applegate Valley in Southern Oregon for a spell.  Here I will undoubtedly hop on the veritable gravy train of cob building opportunities that await me around every blind ess-curve of desolate mountain road.  For now though I am content to be awoken by the insistent screech of the Red-shouldered Hawk, the hesistant chirping of the Cassin’s Vireo and the mechanical drone of the road grader.  Alas, tranquility is evasive as ever, even swaddled in the comforting embrace of 16 inch thick cob walls.  Anyway, here are some pictures…


Here we have the kitchen/dining room/living room/yoga room.


Wall niches with a truly hilarious painting of a hippo in a boat and the first of many bird related decorations to pop up in this series of photos. We’ll call it, “Red-headed Woodpecker”, by James Spring.


Second half of living room, etc. with wood stove (my only source of heat other than passive solar which provides most heat outside of the dead of winter) and my beloved Swedish axe in the background.


Owl friend.


Bedroom with bookshelf and a little shout out to Iowa on the wall courtesy of my sister, Kirsten.

So there you have it.  A small taste of life in my new dwelling.  If you were paying close attention you may have noticed there is no refrigerator.  Since the whole place runs on solar and is totally off the grid, energy intensive appliances like refrigerators (save the newest fangled and most efficient of them), washing machines, blenders and the like are not an option.  But I have a little solar fridge outside in the shade.  It’s basically a normal sized cooler with some sort of fan device that sucks out the warm air or some such thing (i’m still trying to figure out the finer details but the bottom line is that it works).  I line the inside with liquid containers to increase the thermal mass even more and it actually stays quite cool and now it’s getting cool enough at night that I don’t have to worry about it warming up too much in there once the sun goes down (which of course means the fan stops spinning).  I’m on day 5 or 6 of yogurt and it still seems perfectly fresh so I consider that a good sign.  I’ll spare you any further descriptions of the freshness state of my perishables and bring this post to a merciful end.  In the immortal words of my comrade Clint R. Sikes, good luck and godspeed.

Apprenticeship Week 5 & 6: During which we do finish work

We always have high hopes and an unattainably long list of goals at the beginning of an apprenticeship and we usually end up checking many of those goals off the list, totally forgetting about a fair few of them (hopefully not the ones that involve the structural integrity of the building), and achieving many goals that we had not the foresight to even put on the list at the outset.  This year was no exception.  The list of projects will continue to grow as long as the building stands and I think we laid the foundation for a beautiful and magical dwelling that will hopefully be enjoyed for many years to come.

Image

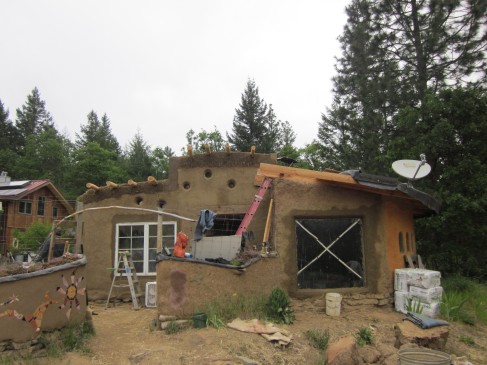
As the building nears completion we install the larger windows (at this point we hope the building is dry enough and our headers above the windows are strong enough to prevent damage due to the cob settling), and the roof rafters which are about 3-5 inch diameter douglas fir poles harvested from the land.

Image

Here is a boring picture of the doorway prior to door construction and insertion.  But it highlights some cob/natural building features and techniques that might be of interest to people unfamiliar with these building methods.  First off the wall thickness of about 16-18 inches can be clearly seen here.  The truth is that the insulation value of cob (as defined by its R-value, the building industries standard for measuring such things) is not terribly high.  Cob is, however, an admirably effective thermal mass and this, my friends, is why the walls are so gall-darn thick!  What this basically means is that as long as the building sits in a sunny spot and the walls are massive enough (18 inches is probably the average for modern cob houses) then it has the ability to absorb thermal energy when the surroundings are higher in temperature than the mass, and give thermal energy back when the surroundings are cooler.  There are other factors of course like placement of roof eaves to block out summer sun and let in winter sun but the bottom line is that cob is an excellent thermal regulator and anyone who has ever been in a well built cob house can likely attest to how comfortable they feel with no supplemental cooling in summer and very little supplemental heating (location dependent and compared to similar sized structures built of other materials of course) in winter.

Another feature you can see in the doorway are wood blocks called ‘deadmen’ that we strategically place throughout the building as we go up so we have something to screw things like door and window frames into.

The final feature is the old doorway on the right side of the photo which has been stuffed with light straw clay.  Light straw clay is a mixture of loose straw and clay mixed to a paint-like consistency and then densely stuffed in a pre-existing wood frame for insulation and then plastered over.  It has an insulation value that is better than cob but inferior to straw bale.

Image

Red pigmented cement shower floor with Mexican tiles.

Douglas fir rafter beams and earthen ceiling prior to finish plaster.  The earthen ceiling is created by stretching chicken wire, hardware cloth or some sort of relatively tight, strong mesh over the beams and securing it.  The wire is then plastered with a very sticky clay/chopped straw mixture which provides structure as well as a medium on which to spread more delicate finish plaster.  Props to the apprentices for coming up with the fan design for the rafters.

The next three photos show the progression of creating a window seat in the building attached to the one we’re primarily working on.

Step 1: Lay earth bags (polypropylene grain bags filled with dirt and gravel and in the case of the ones we used on part of our foundation’s stem wall, stabilized with a bit of cement) and fill in the gaps with cob.

Step 2: Cob over earthbags and make shelves with cob (left and right of bench).

Step 3: Finish plaster, slightly more inviting and with the addition of pillows it will be the best seat in the house!

Here we see me molding the minds of wide-eyed and eager underlings in the art of the earthen floor.

And here I am burnishing (using a yogurt lid to push the sand grains into the finish plaster so it becomes smooth and soft) a wall that was inexpertly butchered by someone.  Just kidding, the apprentices actually did an amazing job on the plastering and floor and you’ll see in the following photos.

Finish Plaster & Floor

Kitchen windows and shelves.

Where two plasters meet: the darker plaster on the left is an earthen plaster and the lighter on the right is a lime plaster, both with a yellow iron-oxide pigment added.

Same area, different angle.  From here you can really see the beautiful textural effect that the plasters create.  If burnished properly and with the help of a little flour paste (which acts as a binder) the plaster will be soft and smooth and should have little or no dusting issues.  Electrical boxes can be seen here as well.  The wiring is buried a few inches into the wall.

Here we see the cob bathroom wall on the left, douglas fir beams holding up the sleeping loft above, loft ladder (expertly crafted by Ryan, one of the apprentices) and the back of the dining area/window seat bench on the far right.

Main room from the front door with finished plaster and finished floor.

This is another view from the front door looking at the shower/bathroom area.  There will be a little composting bucket toilet behind the small wall to the right. The post on the right will serve to help hold up the loft and also provide one corner for a closet area that will be just inside the doorway up against the west wall of the pre-existing building (not in the picture).

This is a view from the semi-circular windows on the west side which gives a good view of the window seat bench, the loft and the doorway into the older attached building.  Sorry for the poor photo quality but after the floor was laid I couldn’t get inside so i had to take it through the window.

Almost finished! The roof now has plywood planking over the rafter beams and an EPDM (a type of synthetic rubber)  pond liner on top of that for rain protection.  The pinkish layer around the foundation is a lime plaster which will prevent water damage around the foundation.  Eventually we’ll put some facing boards around the edge of the roof and some soil and plants on top, most likely succulents that don’t require much care (translation, “no care”).

And so it ends.  It may only be a couple hundred square feet (a hovel compared to  modern American housing standards [According to the National Association of Home Builders, the average home size in the United States was 2,700 square feet in 2009, up from 1,400 square feet in 1970]) but it also only cost a couple thousand dollars to build (according to a 2011 National Association of Home Builders survey [http://www.nahb.org/generic.aspx?sectionID=734&genericContentID=169974&channelID=311] the average total construction cost for a single family home in the U.S. based on an average square footage of  2300 sq. ft. was $184,125).  Of course I’m not factoring in the cost of labor since we had 8 people paying to be part of the apprenticeship rather than being paid to build.  But even had they all been paid the total cost would still have come in under $50,000, a sum far less daunting than the aforementioned $184,125.   But the real point of all this is that it’s possible to build a beautiful and structurally sound home with a few moderately experienced builders and a small group of novices in less than two months, which is pretty cool.  It’s also a model that makes this style of building accessible to a lot of people who might otherwise  have no recourse but to hire out a bunch of contractors and sub-contractors and engineers and architects to build them a house that’s too big and takes a really long time to clean and pretty much looks the same as everyone else’s house.  I’m obviously biased and probably a weirdo, but I’ll take the mud hut any day and I’m pretty sure Bilbo Baggins would agree…