We always have high hopes and an unattainably long list of goals at the beginning of an apprenticeship and we usually end up checking many of those goals off the list, totally forgetting about a fair few of them (hopefully not the ones that involve the structural integrity of the building), and achieving many goals that we had not the foresight to even put on the list at the outset. This year was no exception. The list of projects will continue to grow as long as the building stands and I think we laid the foundation for a beautiful and magical dwelling that will hopefully be enjoyed for many years to come.
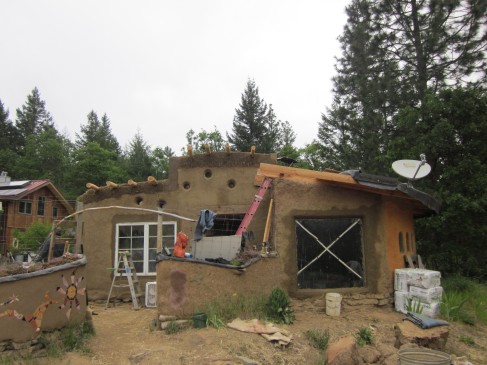
As the building nears completion we install the larger windows (at this point we hope the building is dry enough and our headers above the windows are strong enough to prevent damage due to the cob settling), and the roof rafters which are about 3-5 inch diameter douglas fir poles harvested from the land.
Here is a boring picture of the doorway prior to door construction and insertion. But it highlights some cob/natural building features and techniques that might be of interest to people unfamiliar with these building methods. First off the wall thickness of about 16-18 inches can be clearly seen here. The truth is that the insulation value of cob (as defined by its R-value, the building industries standard for measuring such things) is not terribly high. Cob is, however, an admirably effective thermal mass and this, my friends, is why the walls are so gall-darn thick! What this basically means is that as long as the building sits in a sunny spot and the walls are massive enough (18 inches is probably the average for modern cob houses) then it has the ability to absorb thermal energy when the surroundings are higher in temperature than the mass, and give thermal energy back when the surroundings are cooler. There are other factors of course like placement of roof eaves to block out summer sun and let in winter sun but the bottom line is that cob is an excellent thermal regulator and anyone who has ever been in a well built cob house can likely attest to how comfortable they feel with no supplemental cooling in summer and very little supplemental heating (location dependent and compared to similar sized structures built of other materials of course) in winter.
Another feature you can see in the doorway are wood blocks called ‘deadmen’ that we strategically place throughout the building as we go up so we have something to screw things like door and window frames into.
The final feature is the old doorway on the right side of the photo which has been stuffed with light straw clay. Light straw clay is a mixture of loose straw and clay mixed to a paint-like consistency and then densely stuffed in a pre-existing wood frame for insulation and then plastered over. It has an insulation value that is better than cob but inferior to straw bale.
Red pigmented cement shower floor with Mexican tiles.
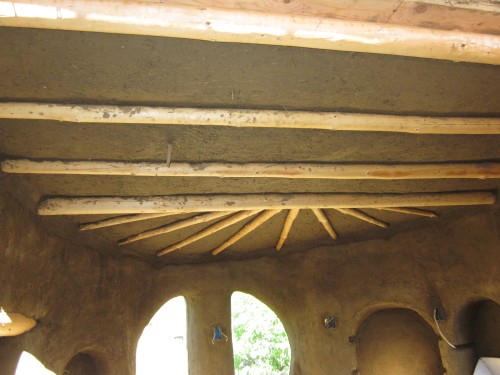
Douglas fir rafter beams and earthen ceiling prior to finish plaster. The earthen ceiling is created by stretching chicken wire, hardware cloth or some sort of relatively tight, strong mesh over the beams and securing it. The wire is then plastered with a very sticky clay/chopped straw mixture which provides structure as well as a medium on which to spread more delicate finish plaster. Props to the apprentices for coming up with the fan design for the rafters.
The next three photos show the progression of creating a window seat in the building attached to the one we’re primarily working on.
Step 1: Lay earth bags (polypropylene grain bags filled with dirt and gravel and in the case of the ones we used on part of our foundation’s stem wall, stabilized with a bit of cement) and fill in the gaps with cob.
Step 2: Cob over earthbags and make shelves with cob (left and right of bench).
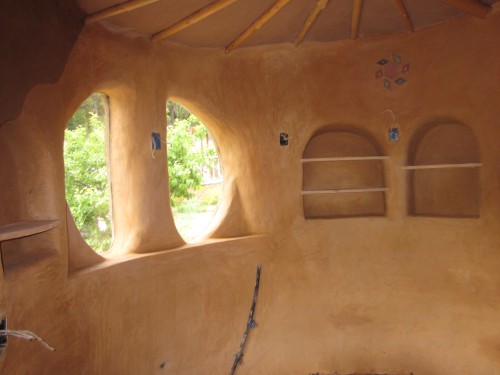
Step 3: Finish plaster, slightly more inviting and with the addition of pillows it will be the best seat in the house!
Here we see me molding the minds of wide-eyed and eager underlings in the art of the earthen floor.
And here I am burnishing (using a yogurt lid to push the sand grains into the finish plaster so it becomes smooth and soft) a wall that was inexpertly butchered by someone. Just kidding, the apprentices actually did an amazing job on the plastering and floor and you’ll see in the following photos.
Finish Plaster & Floor
Kitchen windows and shelves.
Where two plasters meet: the darker plaster on the left is an earthen plaster and the lighter on the right is a lime plaster, both with a yellow iron-oxide pigment added.
Same area, different angle. From here you can really see the beautiful textural effect that the plasters create. If burnished properly and with the help of a little flour paste (which acts as a binder) the plaster will be soft and smooth and should have little or no dusting issues. Electrical boxes can be seen here as well. The wiring is buried a few inches into the wall.
Here we see the cob bathroom wall on the left, douglas fir beams holding up the sleeping loft above, loft ladder (expertly crafted by Ryan, one of the apprentices) and the back of the dining area/window seat bench on the far right.
Main room from the front door with finished plaster and finished floor.
This is another view from the front door looking at the shower/bathroom area. There will be a little composting bucket toilet behind the small wall to the right. The post on the right will serve to help hold up the loft and also provide one corner for a closet area that will be just inside the doorway up against the west wall of the pre-existing building (not in the picture).
This is a view from the semi-circular windows on the west side which gives a good view of the window seat bench, the loft and the doorway into the older attached building. Sorry for the poor photo quality but after the floor was laid I couldn’t get inside so i had to take it through the window.
Almost finished! The roof now has plywood planking over the rafter beams and an EPDM (a type of synthetic rubber) pond liner on top of that for rain protection. The pinkish layer around the foundation is a lime plaster which will prevent water damage around the foundation. Eventually we’ll put some facing boards around the edge of the roof and some soil and plants on top, most likely succulents that don’t require much care (translation, “no care”).
And so it ends. It may only be a couple hundred square feet (a hovel compared to modern American housing standards [According to the National Association of Home Builders, the average home size in the United States was 2,700 square feet in 2009, up from 1,400 square feet in 1970]) but it also only cost a couple thousand dollars to build (according to a 2011 National Association of Home Builders survey [http://www.nahb.org/generic.aspx?sectionID=734&genericContentID=169974&channelID=311] the average total construction cost for a single family home in the U.S. based on an average square footage of 2300 sq. ft. was $184,125). Of course I’m not factoring in the cost of labor since we had 8 people paying to be part of the apprenticeship rather than being paid to build. But even had they all been paid the total cost would still have come in under $50,000, a sum far less daunting than the aforementioned $184,125. But the real point of all this is that it’s possible to build a beautiful and structurally sound home with a few moderately experienced builders and a small group of novices in less than two months, which is pretty cool. It’s also a model that makes this style of building accessible to a lot of people who might otherwise have no recourse but to hire out a bunch of contractors and sub-contractors and engineers and architects to build them a house that’s too big and takes a really long time to clean and pretty much looks the same as everyone else’s house. I’m obviously biased and probably a weirdo, but I’ll take the mud hut any day and I’m pretty sure Bilbo Baggins would agree…


Outstanding work! Amazing progress for a short period of time.
Nice work Bobby! It’s been great to see the house take shape here. Pretty amazing what you all were able to accomplish.
I’m so glad you mentioned Bilbo because the whole time I was reading I was thinking “this is a Hobbit house”!! It’s awesome and beautiful – the details are amazing! Well done!
Seriously. Where did you find time to hatchet things and look at birds?
This…this is the blog I am looking for! Thanks ever so much for sharing these – in a few months I’m enrolled on my first Cob course and hope to be making plans to find some land in my native Ireland next Spring. This is a wealth of information and inspiration, so huge thanks 🙂 And wishing you & yours a very happy new year! S.x